Subversion+SSH with Xcode 2.1
I found the
Xcode 2.1 User Guide to be slightly too vague on the subject
of Subversion in Xcode, so at the urging of some folks at the
Xcode-users list, I made this page about how I got Subversion+SSH all set up. I'll use the following conventions: code that you execute on your Mac will be presented as:
$ command
And code that you execute on your server:
> command
And of course, if you're serving the repository from your Mac, just disregard the difference, but still follow all the steps. Technical notes you can skip will look like this:
Tech Note:
I chose svn+ssh mainly because svnserve alone doesn't offer encrypted transmission, and I don't have enough implicit trust in it to run it standalone anyway. I ruled out using Apache httpd as a Subversion server, because I have httpd set up as a proxied, dedicated mod_perl server; all static pages (including this one) are served by my favorite server ever, Acme Lab's thttpd. Anyway, Apache's httpd is a very hungry app, and for performance reasons I can't have multiple versions of it running. Besides, I dislike the "pay for trust" philosophy of SSL. SSH is lightweight, open source, already installed and running on your box, and offers pretty nice protection.
Local Time
The first thing I did was install Subversion for Mac OS X. I followed Apple's installation notes,
which worked fine, so I won't repeat them here.
Remote possibility
I run my own server, so I was able to control this myself, but others may have to consult their administrator for help with the server side, especially if your SSH login procedure is non-standard. I use FreeBSD, so all I had to do was install the port of Subversion, and I was off and running.
Group hug
If you don't already have a group set up for your project on the server, now is the time. Everyone who is going to use the svn needs to be a member of the same group.
Wrap artist
When you install svn on the server, it should also install two files, called svnserve and svnserve.wrapper. Rename svnserve svnserve.bin, and rename svnserve.wrapper svnserve. Make sure the wrapper is readable and executable for everyone in the svn group (chmod 770). If you can't find the wrapper, make your own, something along the lines of:#!/bin/sh
umask 002
svnserve.bin
Tech Note: The wrapper sets the "umask" to 002 before invoking svnserve, which helps keep your changes to the svn accessible to the group.)
SSH... I'm hunting wabbits.
Set up SSH as described here. In my experience, Xcode does not do well when your key has a passphrase, so I recommend leaving it blank. This does not mean your SSH password will be blank; it just means that when you're logged in as you on your machine, you won't have to enter it. After you complete this step, you should be able to do:
$ ssh you@example.org
And have it log you right in without a password. If it prompts you for a password, or gives you a permissions error, double check that your home directories (both on the Mac and on the server) are set to be writable only by you. Unless you have a good reason not to do so, you might as well restrict read access for everyone else as well. I suggest you do the following on both your Mac and server, just to be sure you have your permissions in order:
> chmod 700 ~
> chmod 700 ~/.ssh
> chmod 600 ~/.ssh/id_dsa
> chmod 622 ~/.ssh/id_dsa.pub
All your project files likely reside in a single folder right now, which was created by Xcode when you made a new project:
Make three new folders inside your main project folder, called trunk, branches and tags. Then drag your project files into trunk:
Now your project is prepared for The Future, when branches/ will contain new projects based on the original, and tags/ will hold copies of your favorite builds of the past, even endowed with pet-names (or "tags"), such as "1.0."
Let us get this party started, "up in here."
The next step is creating the suppository repository on the sever. Decide on a good place to put it (don't put it on a public part of the server), and do something like the following as your own user—ie, not root—on the server.
> umask 002
> svnadmin create /example/repository
Note that it'll create the last directory in the path if it doesn't exist, but I think you have to manually create any other directories—just be sure to set your umask before you go off creating things for the repository.
An issue of great import
Import your project into the repository by issuing a command like this from your Mac, replacing it with your details (I've broken it into three lines, but you can type it as one if you leave out the backslashes):
$ svn import /Users/you/HotSauce \
svn+ssh://example.org/example/repository/hotsauce \
-m "Initial import of HotSauce files"
The first line tells svn where your project is, the second line tells it where it's going, and the third line appends a little text note describing the operation. Whenever you make a revision to a svn project, you need to add a note explaining what you did; that way, you can come back a year later and see that Revision 1629 was "a small bugfix to the dream recording subroutine." If everything is in order, it will tell you what files it added, and then you should hear back:
Committed revision 1
Woo-hoo!
Check it out
Your originals, the local files that you just committed to the repository, are now charmingly quaint relics. Compress them and store them somewhere safe. From now on, you'll be interacting with a "working copy" of the repository. To grab this working copy, check the files out onto your Mac (all one line):
$ svn checkout svn+ssh://example.org/example/repository/hotsauce/trunk ~/hotsauce
Notice that the syntax of checkout is "svn checkout source destination"—here I've designated ~/hotsauce as the local destination for my copy of the repository. You should get feedback like:
A ~/hotsauce/HotSauce_Prefix.pch
A ~/hotsauce/HotSauce_xcodeproj
A ~/hotsauce/Info.plist
...
Checked out revision 1.
Cracking the Xcode
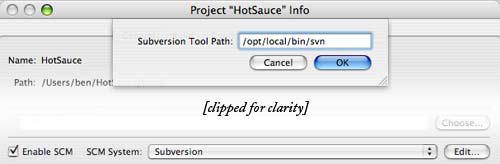
You should have a local copy of your project checked out now, so find it in the Finder, and open up that .xcodeproj! Now, do Get Info on your project (from within Xcode) and, under the "General" tab, select "Subversion" from the "SCM System" popup, check "Enable SCM," and click "Edit..." to set the Subversion Tool Path. If you followed the above instructions, you should set it to /opt/local/bin/svn— but you can always double check the path to svn by doing:
which svn
in the Terminal. Basically, your Project's Info should look about like this:
Xcode may prompt you for your passphrase at some point—if you've left your key's passphrase blank, just hit OK. And now you're ready to begin editing files! You can keep an eye on changes and conflicts in the handy SCM Results window.
Now, you!
Well, you should have Subversion purring along in Xcode by now. The rest is better explained by the high-quality, free online book, which is also available is dead-tree format from the mercilessly paycheck-depleting folks at O'Reilly. Damn you, O'Reilly, and your irresistibly high-quality technical books!
If you should have trouble...
...I probably will be as stumped as you. There are many folks much more knowledgeable than I on the Xcode-users list and the Subversion "users" list. But if you think I might be able to help, or if you notice anything that seems egregiously wrong, please send an electronic mail addressed to the word "lists" followed by a "commercial at" (or "at symbol"), which should also subsequently be followed by my domain name, which you may already be familiar with, as this page's URI begins with it; however, for those requiring elucidation, it can be constructed by concatenating my given name with my family name, and appending a first-class top-level domain of your choosing (such as .com, .net or .org).
God I hate spam.
- ben syverson